How to connect Xcode, SVN and Versions
Honestly speaking, it took me an awful lot of time to setup and connect Xcode (the Apple OS X development suite) with the Subversion source code control system SVN and Versions (aka Versions.app), one of the newer Subversion Mac clients (another one being Cornerstone). Now it actually seems I got it working with a local repository. To help me not forgetting the configuration details I’ve written this tutorial: It’s only six easy steps to get it up and running!
Step 1: Create a Repository
First, we have to create a repository inside Versions for your project, which will store our Xcode project code. This is not really difficult as the main screen of Versions presents several options to do so:

I personally chose to create a local repository but this is up to everybody to decide (a local repository is in the end just a folder on my HDD). It is advisable to create a separate repository for every new project. I had a joint repository for some other software projects, however, this turned out to be not the best of all ideas as SVN counts the builds numbers per repository – so my several project were sharing build numbers which is not that fine.
Step 2: Checkout a Working Copy
Next, we will checkout a working copy which we will work with (I’ll assume that you know the basics about repositories, working copies and so on). To do so, select the new repository, and do so not by selecting the new entry in the source list but by selecting the entry in the main section of the Versions window (otherwise the checkout button in the toolbar will be disabled):

Now we can checkout a working copy (use the checkout button in the toolbar). Give the working copy directory the name of your project (in our example, it is called “PLister”). This will be the directory in which we will store the Xcode project files. Of course this directory is empty at the moment as there are no project files (neither in the repository nor elsewhere). Once we have created our working copy directory Versions will add a bookmark to it to the source list, below the repository entry.
Step 3: Create the Xcode Project
Let’s then create our project in Xcode and give it the same project title we have used for the working copy directory (see above). Save the Xcode project in the parent directory of that directory in which you created the working copy directory and give it the same name as the working copy directory. As your Xcode project directory and the working copy directory share the same name and the same location, Xcode asks you if you really want to replace the existing directory – just confirm that. Xcode will save the initial project files in our working copy directory. Now you can close Xcode for the moment.
Step 4: Add and Commit the Project Files to the Repository
Back in Versions you will find the Xcode project files displayed in the main window, each of them which a question mark symbol as they haven’t been added to the repository yet:

We tell Versions that we want to add all files to the repository by selecting them, right-clicking and use of the “add” command. The symbols will now change to display an “+” which means they are scheduled to be added to the repository: Changes won’t take place place immediately but only when we commit the changes, i.e. transfer the working copy back into the repository. Let’s just do that now by clicking on the commit button in the toolbar.
Step 5: Ignore Build Folder
That’s it, at least for the moment. However, once we compile and build our Xcode project, new files will be added to the working copy directory by Xcode – the build files. Usually it is neither necessary nor wanted to place them under version control as they change (obviously) with every build and don’t contain source code. We therefore have to tell Versions (and SVN) to ignore these files though they are present in the working copy directory: Once you fire up Versions again you will see the build files in the main view. The build folder has that question mark symbol next to him. In order to tell Versions to ignore this folder (and all the files contained in it) just select the project’s working copy root folder in Versions and add “build” to the ignore property:

In theory, you could also right-click on the build folder and select the ignore command. The build folder will then vanish from the table and the properties section of the working copy folder (tab view to the right of the main view) will show an entry in the ignore field, too, but I got lots of error messages then during later commits.
Step 6: Configure SCM in Xcode
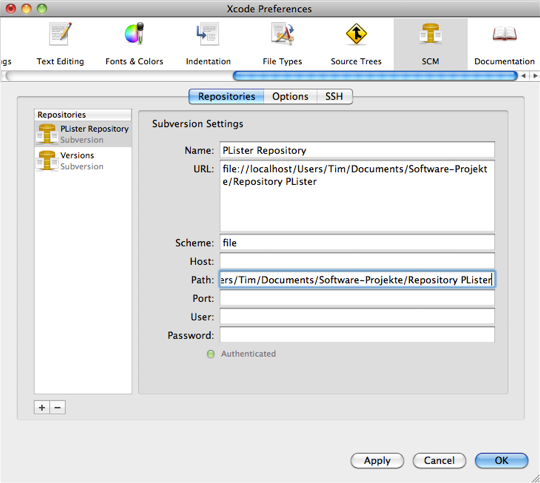
Finally, we have to configure source code management (SCM) in Xcode. By doing this we will be able to checkout copies, commit changes and to perform other operations with the repository without starting Versions. All we have to do is to open the Xcode preference pane and to select the SCM section. In the repositories tab, add a new repository entry to the table view by clicking on the “+” button:

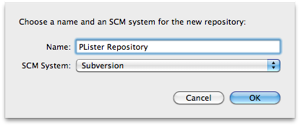
Give it a nice name and choose Subversion as SCM system. Then enter the Scheme (it is “file” for a local repository) and the correct path to the repository directory. In our example of a local repository, it should read as follows (note the “file://localhost/..” prefix, the exact local path depends on your HDD directory structure):

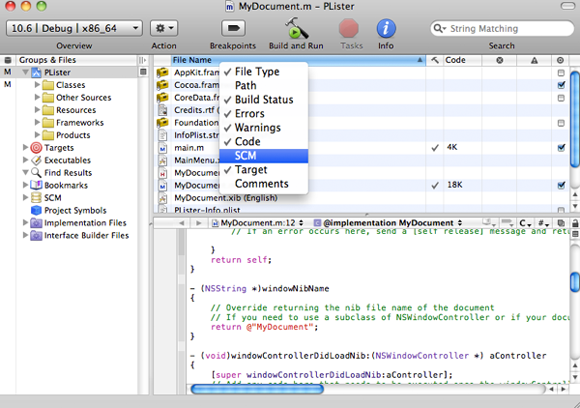
The Path entry should be completed by Xcode. You may also configure some other options in the options tab but that’s not necessary for the start and you can close the preference window. In order to stay informed about the version control status of your project file, you should enable the SCM column in Xcode’s main view by right-clicking on the column heading:
